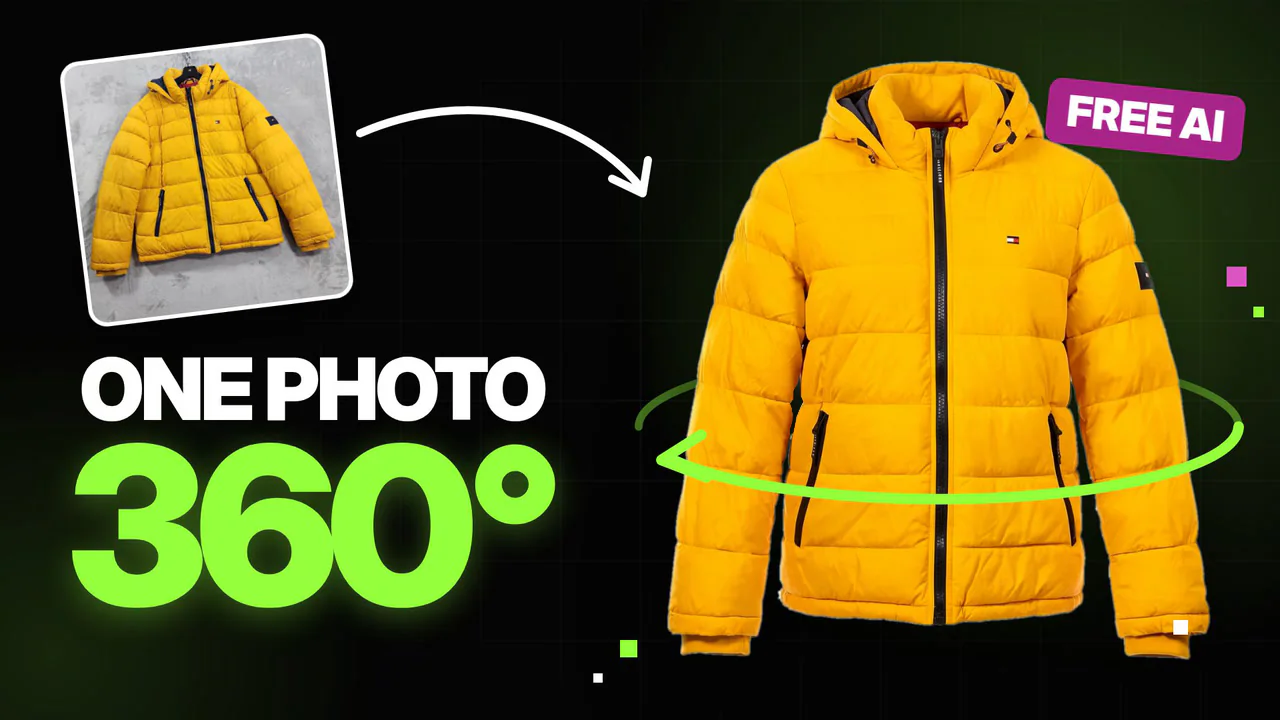
This AI ghost mannequin workflow turns one ordinary clothing photo, like a jacket on a hanger from an eBay listing, into a hollow ghost mannequin product shot and then a full 360 product video. Everything runs inside ComfyUI with free, open models on your own GPU: Flux 2 Klein 9B for the image edits, SAM 3 for automatic framing, and MiniMax H3 with a 360 Orbit LoRA for the spin.
Watch the full build in the video above. Below you'll find every setting, every prompt and every link, and the workflow files are in the download section at the bottom.
AI ghost mannequin made in ComfyUI from a single listing photo of a yellow puffer jacket
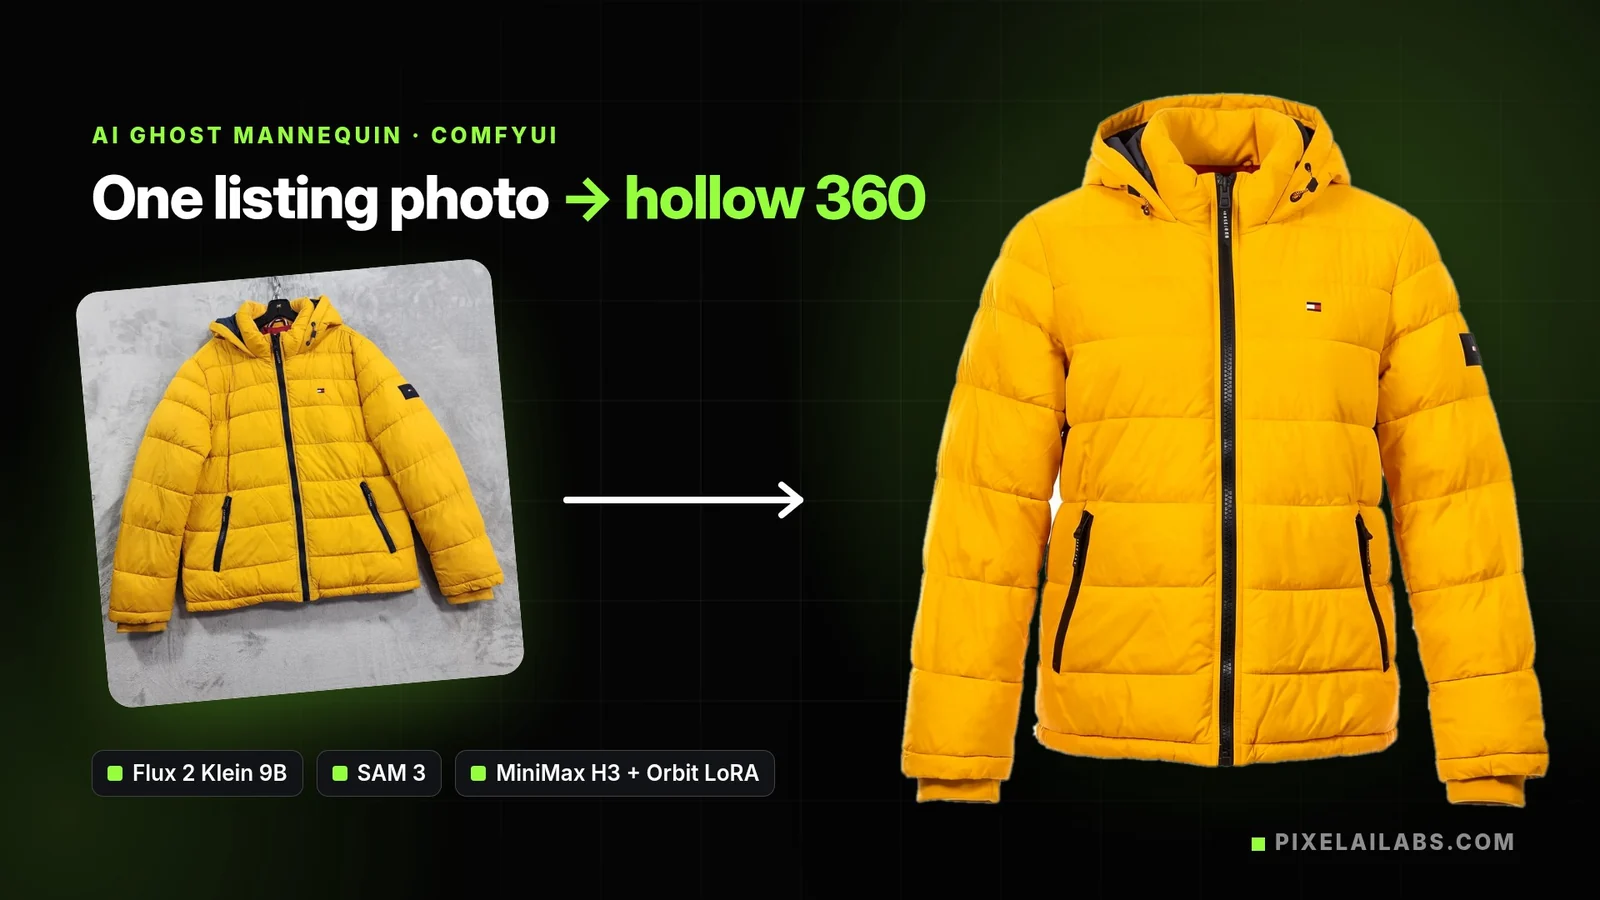
Table of contents
What is a ghost mannequin?
Ghost mannequin photography (also called the invisible mannequin or hollow man effect) is a classic e-commerce technique. A studio shoots the clothes on a real mannequin, then edits the mannequin out, so the garment keeps the shape of a body but looks hollow, with nobody inside it.
It's the look you see on most big clothing stores, because it shows fit and shape without a model distracting from the product. The catch is that it normally needs a mannequin, lighting, several shots and a retoucher.
This workflow fakes the whole photo shoot with AI. You start from the photo you already have, and you end with a hollow product photo and a spinning 360 video you can post on your store or social pages.
How the workflow works
Ghost mannequin AI workflow in four steps: listing photo, mannequin, hollow ghost, 360 spin
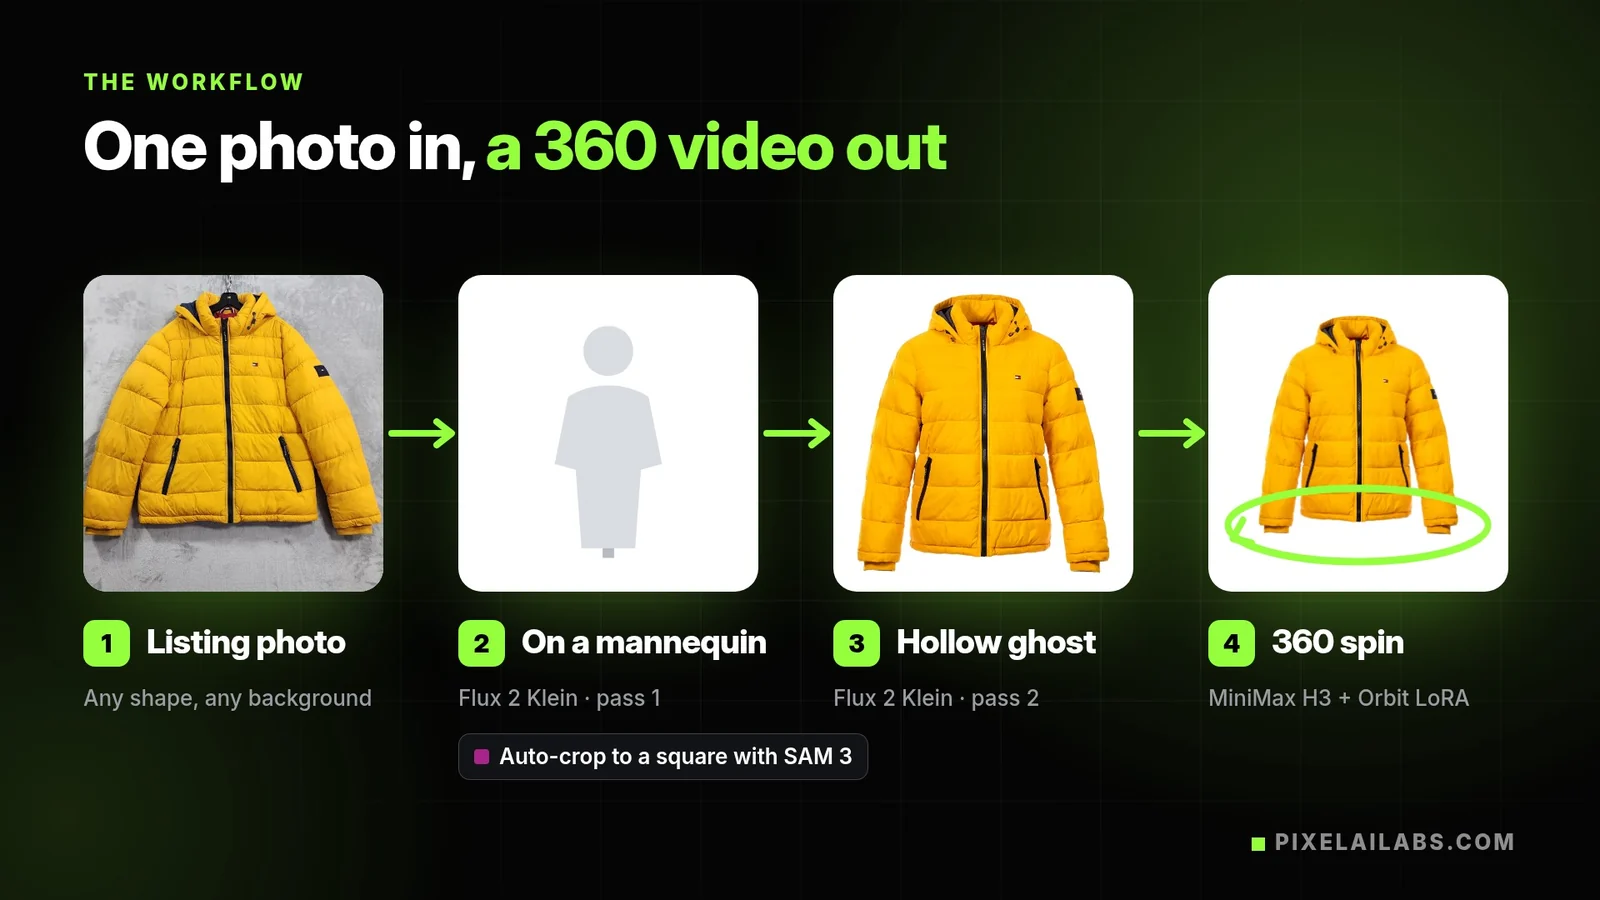
- Flux 2 Klein, pass 1 puts the exact garment from your photo on a mannequin on a white background.
- SAM 3 finds the garment and frames it, so the output is always a perfect square.
- Flux 2 Klein, pass 2 removes the mannequin and keeps the hollow garment shape.
- MiniMax H3 + the 360 Orbit LoRA turns the hollow front (and back) into a seamless 360 spin.
The key trick is in step 1: asking for the ghost straight away didn't work well in my tests. Asking for a real mannequin first gives the garment a believable body shape, and removing the mannequin afterwards keeps that shape.
What you need
- An up-to-date ComfyUI install with ComfyUI Manager. If you've never installed custom nodes, follow our ComfyUI Manager and custom nodes guide first.
- An Nvidia GPU. No strong GPU? RunPod Template has every custom node and model preloaded.
- The two workflow files from the download section.
Custom nodes
Install these from ComfyUI Manager, then restart ComfyUI:
| Node pack | Used for |
|---|---|
| ComfyUI-SAM3 | Finding the garment with a text prompt |
| ComfyUI_LayerStyle | CropByMask V3, the tight crop around the garment |
| ComfyUI-Easy-Use | Image Size By Longer Side, the square trick |
| comfyui-art-venture | Scaling the H3 reference images |
| ComfyUI_essentials | Mask preview |
| WAS Node Suite (search it in the Manager) | Combining SAM 3 masks |
| rgthree-comfy | Before and after image comparer |
MiniMax H3 and Flux 2 Klein run natively in ComfyUI, so they don't need extra node packs.
Models
| File | Folder | Download |
|---|---|---|
flux-2-klein-9b-fp8.safetensors | ComfyUI/models/diffusion_models/ | Black Forest Labs |
qwen_3_8b_fp8mixed.safetensors | ComfyUI/models/text_encoders/ | Comfy-Org |
flux2-vae.safetensors | ComfyUI/models/vae/ | Comfy-Org |
SAM 3 (sam3.pt) | ComfyUI/models/sam3/ | Loaded by the SAM 3 loader node |
| MiniMax H3 models | see the official guide | ComfyUI MiniMax H3 guide |
360 Orbit LoRA (minimax_h3_flf2v_lora_v1.safetensors) | ComfyUI/models/loras/ | MiniMax-H3-360-Orbit-LoRA by Pablo Dawson |
For MiniMax H3 you need the first-and-last-frame model (minimax_h3_fl2va_pruned_int8_convrot.safetensors) for step 4, the FL2VA + Ref2VA hybrid (minimax_h3_hybrid_fl2va_ref2va_b15-49-int8.safetensors) for step 5, the text encoder qwen3vl_32b_minimax_h3_nvfp4_awq.safetensors, and the video and audio VAEs from Comfy-Org/MiniMax-H3. The ComfyUI templates list every file with its download link.
Step 1: Put the garment on a mannequin
Open Templates in ComfyUI and load Flux.2 [Klein] 9B Distilled: Image Edit. Clear out everything you don't need, so you're left with one simple image edit path.
Inside the image edit subgraph, change three things:
- Model:
flux-2-klein-9b-fp8.safetensors - VAE: the official
flux2-vae.safetensors - CFG 1 and 4 steps. Klein is a distilled model, which means it was trained to finish in a handful of steps instead of thirty. That's why it's so fast.
Scale the input to 2 megapixels. If your garment has small text, a logo or fine details, push it to 4 megapixels.
Then copy the photo from the listing and paste it straight into the Load Image node (Ctrl+V works). Use this prompt:
put the exact jacket from picture 1 in the center of the image and on a front-facing mannequin on a white background.Swap "jacket" for your garment: "shirt", "hoodie", "jersey" and so on. The result is the same garment, with the logo and details intact, now worn by a mannequin.
Step 2: Auto-crop to a square with SAM 3
SAM 3 garment mask turns any photo shape into a square without cutting a sleeve
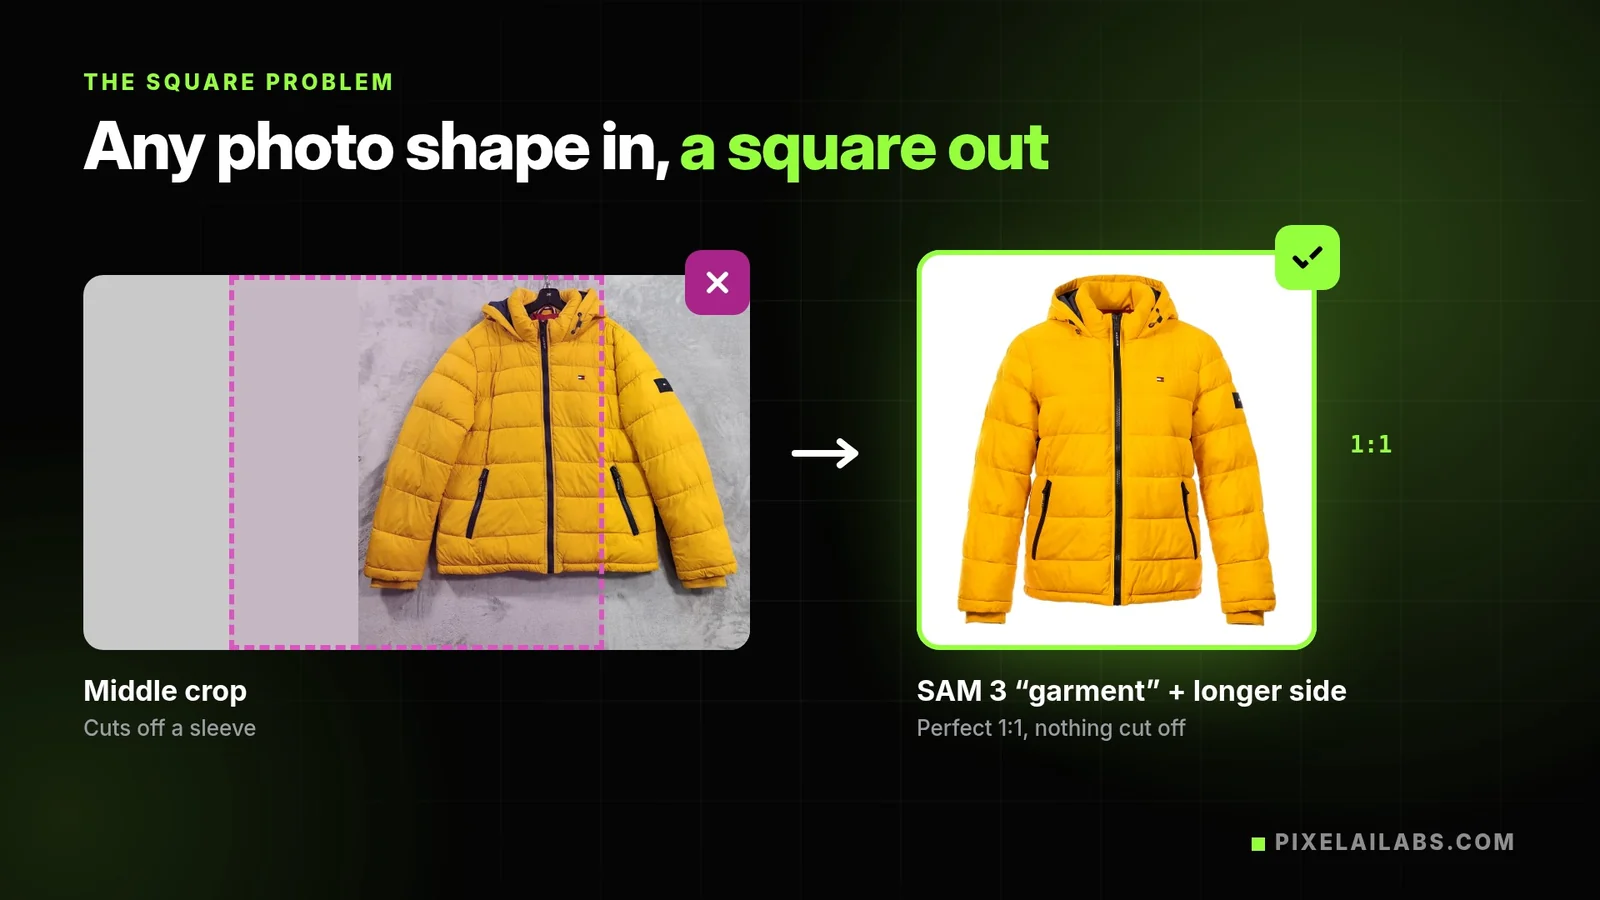
Flux copies the shape of whatever you feed it, so a landscape photo comes back landscape. The orbit video needs a perfect square, and a simple middle crop chops off a sleeve.
The fix is to let ComfyUI find the garment and frame it for you:
- SAM 3 Text Segmentation: feed it the scaled image and type
garmentas the prompt ("clothing" works too). It returns a mask of exactly that object. The saved workflow uses a confidence threshold of 0.2. - Grow Mask by 30 px, so the edges aren't clipped.
- LayerUtility: CropByMask V3 cuts the image tightly around the garment, with 20 px of padding on each side.
- Image Size By Longer Side measures the crop and returns the bigger side. Send that one number to both the width and height of the empty latent and to the scheduler.
Now Flux builds a square canvas using that side length. In the video, the jacket came out at 1184 × 1184. Whatever shape goes in, a square comes out.
Step 3: Remove the mannequin
Duplicate the whole image edit subgraph. The copy is your second pass. Plug the output of pass 1 into the input of pass 2, and add an Image Comparer (rgthree) so you can slide between before and after.
Inside pass 2, delete the SAM 3 nodes. The image is already square, so it goes straight in as the reference, and the original listing photo is connected as a second reference so the details stay true. Then use this prompt:
remove the mannequin, keeping the garment's shape as a hollow ghost-mannequin product photo.The mannequin disappears, but the garment still stands there, completely hollow inside. That's a real ghost mannequin shot with no photographer and no studio. Add a Save Image node so it lands in your ComfyUI output folder.
Step 4: Spin it 360 with MiniMax H3
For the video I use MiniMax H3, an open video model that runs natively in ComfyUI, with the 360 Orbit LoRA by Pablo Dawson.
His recommended setup:
- the first-and-last-frame model (FL2VA), with the same image as both the first and the last frame
- 768 × 768, 73 frames (about 3 seconds at 24 fps), 28 steps, LoRA strength 1.0
- his prompt, copied word for word:
One frozen instant. Only the camera moves. In a continuous 360 orbit. Preserve every person and object in exactly the same world position, orientation, shape and pose throughout the shot. Airborne objects remain suspended at the captured height and angle: no wobbling, shaking, spinning, drifting, falling or continued action. Keep faces, hands, clothing, liquids and the background motionless while retaining their natural appearance. Camera parallax is the only source of apparent movement. No cuts, zoom, morphing or added objects.Drop the LoRA into ComfyUI/models/loras/, load the MiniMax H3 image-to-video template, and use your hollow ghost image as both the first and the last frame. For a quick draft, set the resolution to 0.4 megapixels with a 1:1 aspect ratio.
The template comes with a turbo LoRA already loaded. Swap it for the Orbit LoRA and make sure it's switched on. Without the turbo LoRA, run the recommended 28 steps.
The result is a floating 360 spin from one listing photo. But look closely at the back.
Step 5: Fix the invented back
The model never saw the back of the garment, so it made one up. If you're selling the item, that means you're showing a product that doesn't exist.
Hollow ghost mannequin front and back of the same jacket made with Flux 2 Klein
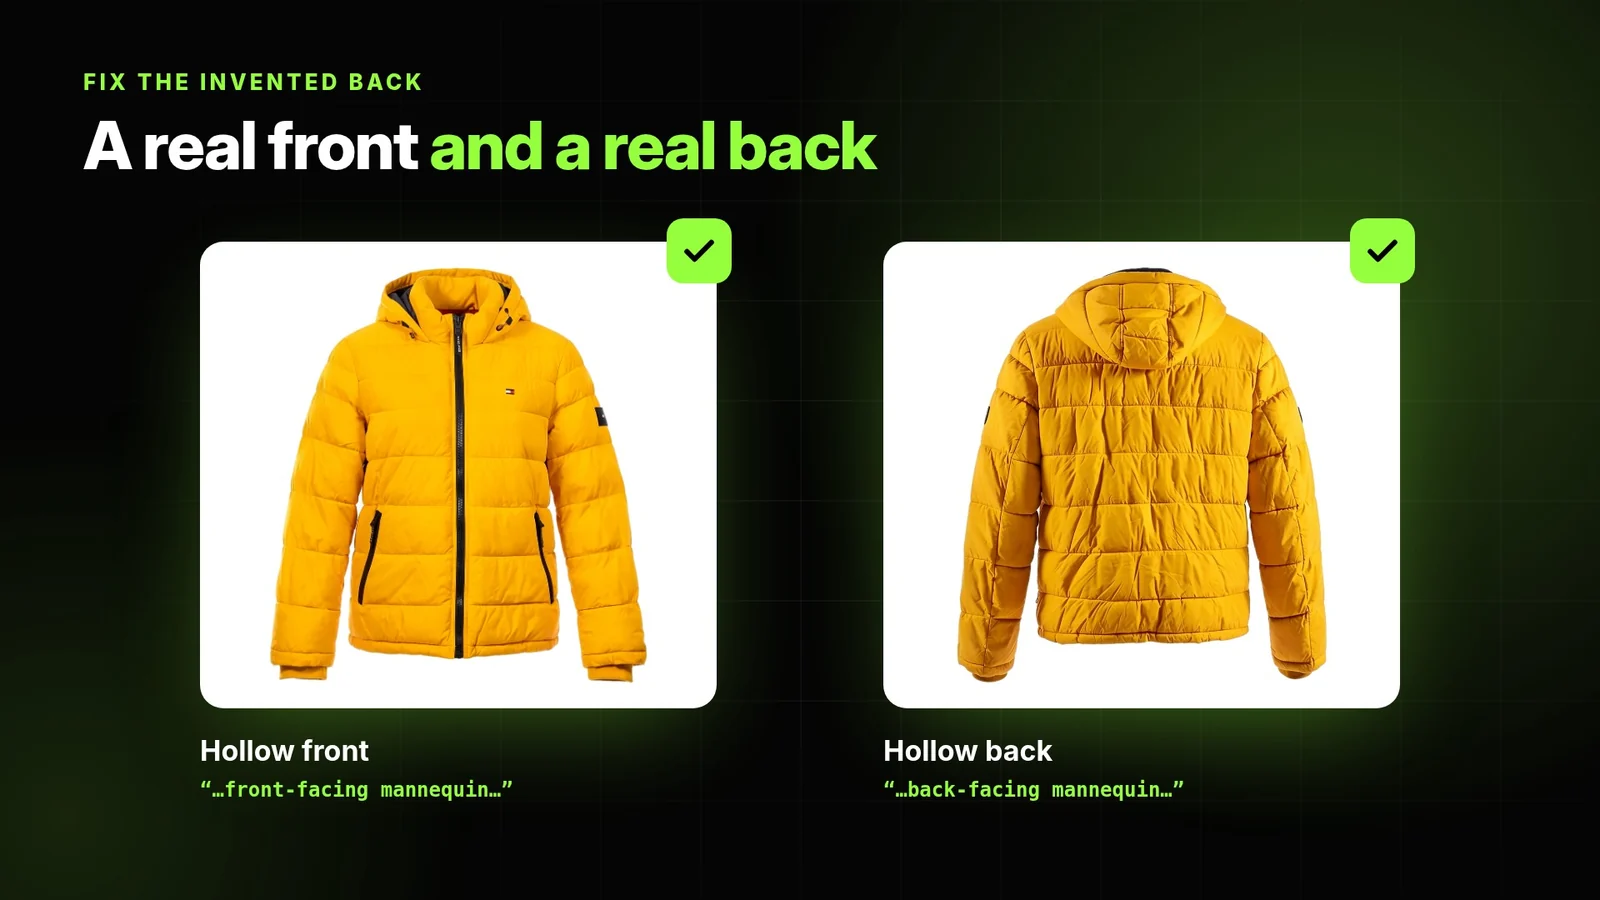
Make a real hollow back. Load the back photo from the listing into the same Flux workflow and change one word in the pass 1 prompt:
put the exact jacket from picture 1 in the center of the image and on a back-facing mannequin on a white background.Pass 2 stays the same, and you get an accurate hollow back.
Why front → back breaks the spin. If you put the front as the first frame and the back as the last frame, the camera only travels 180° and stops. When you loop it, the garment snaps back to the front every time.
Why MiniMax H3 first and last frame stops at 180 degrees and reference to video makes a full 360
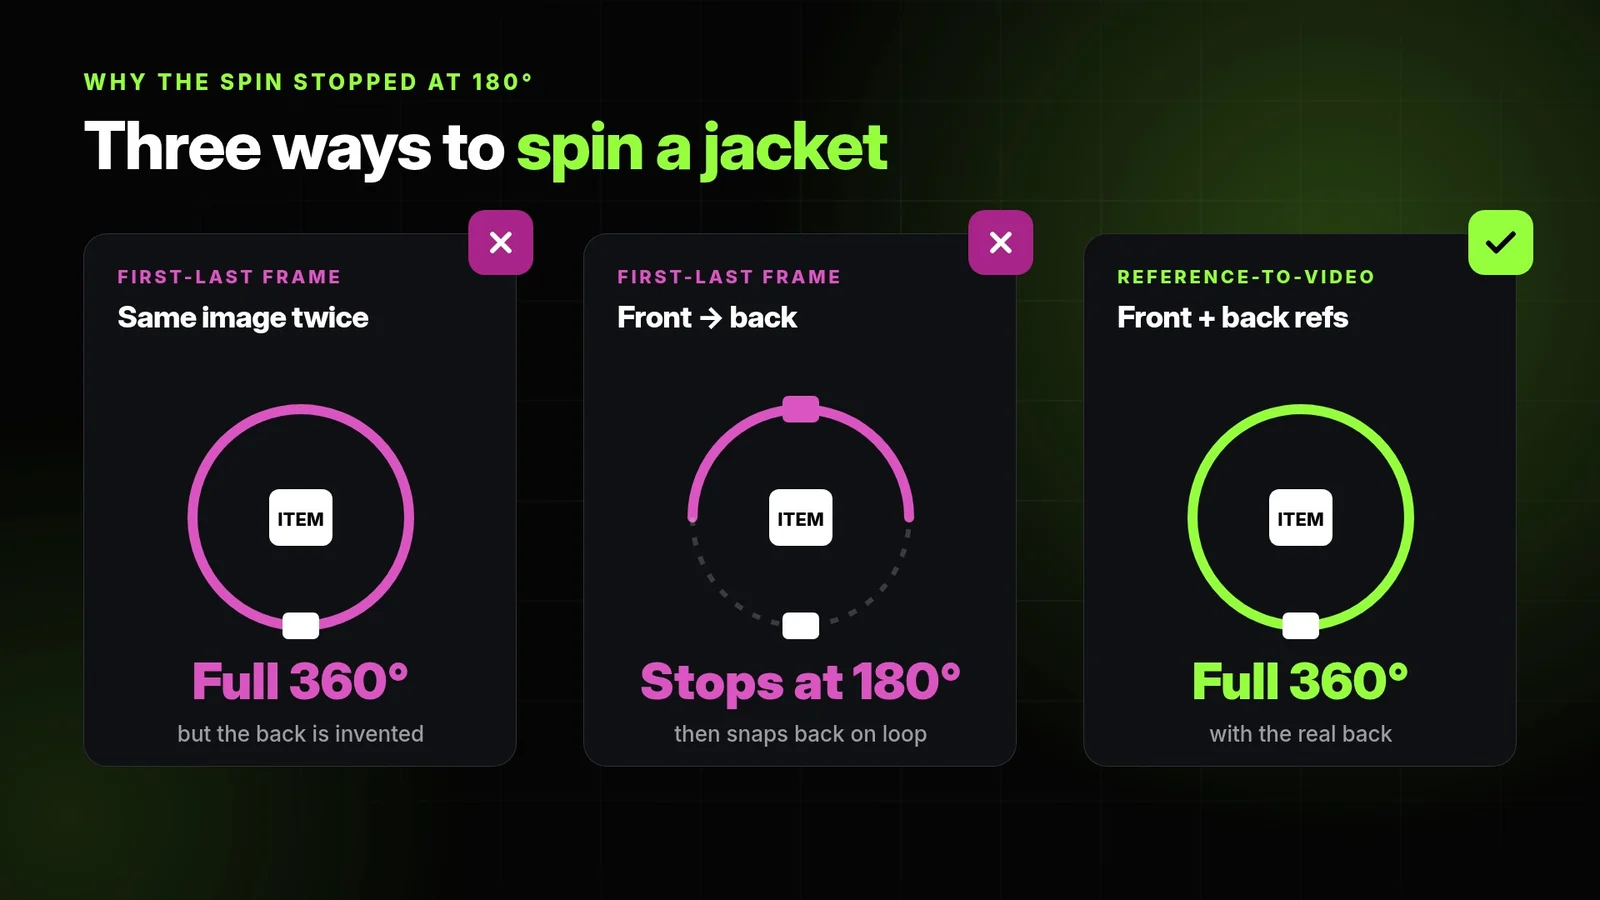
A first-and-last-frame model works like a GPS: it drives from picture A to picture B. When A and B are the same picture, the LoRA teaches it to go all the way around to get home. When B is the back, it takes the shortest road, which is half a circle, and parks.
The fix: reference-to-video. MiniMax H3 also has a reference-to-video (Ref2VA) model that can look at several images at once. The LoRA page warns that Ref2VA treats images as loose references, so its clips don't end on a known frame. I tried it anyway:
- Load the MiniMax H3 reference-to-video template. For the model I use the FL2VA + Ref2VA hybrid
minimax_h3_hybrid_fl2va_ref2va_b15-49-int8.safetensors, which keeps the first-and-last-frame base and adds reference support. - Load the same Orbit LoRA (
minimax_h3_flf2v_lora_v1.safetensors) at strength 1.0, with no turbo LoRA, even though it was trained for the other model. - Draft settings: 0.4 megapixels, 1:1.
- Add two references: the hollow front and the hollow back.
- Raise the length to 90 frames for a slightly longer, slower turn, with 28 steps, the euler sampler and the beta scheduler. Both references are scaled to 2 MP with
ref_image_sizeset tomatch. - Use a prompt rewritten for reference-to-video, following MiniMax's own prompt guide:
subject_definitions:
<Subject 1> is the same person, object, or complete frozen arrangement shown in <Picture 1> and <Picture 2>. <Picture 1> defines the front-facing appearance and initial captured state. <Picture 2> defines the rear-facing appearance of that same subject in that same captured state. Both images describe one consistent subject, including its identity, geometry, proportions, materials, clothing, pose, and any accompanying objects.
<Subject 2> is the seamless white background shown in <Picture 1>.
<Picture 1> is the front-view reference and the composition anchor for the beginning and end of [Shot 1].
<Picture 2> is the rear-view reference and the viewpoint anchor for the halfway point of the camera orbit in [Shot 1].

summary:
[keyframe completion + reference generation] A single continuous shot captures <Subject 1> in one frozen instant against <Subject 2>. Only the camera moves, completing one full 360-degree orbit. The shot begins with the front view established by <Picture 1>, reveals the rear appearance established by <Picture 2> halfway through, and returns to the original front view at the end.

retention_analysis:
<Subject 1> (appears throughout [Shot 1]): fully_preserved - preserve the same identity, shape, proportions, pose, materials, clothing, and arrangement throughout. Use <Picture 1> for front-facing details and <Picture 2> for rear-facing details.
<Subject 2> (appears throughout [Shot 1]): fully_preserved - retain the same seamless white background throughout.
<Picture 1> ([Shot 1] opening and closing front-view anchor): fully_preserved - retain the referenced front appearance and opening composition when the camera returns to its starting viewpoint.
<Picture 2> ([Shot 1] halfway rear-view anchor): fully_preserved - retain the referenced rear appearance when the camera reaches the opposite viewpoint.

detailed_description:
The video retains the natural appearance, materials, and lighting of the references, with the subject clearly visible against a seamless white background.

[Shot 1] One frozen instant. Only the camera moves. In a continuous 360 orbit. Preserve every person and object in exactly the same white background, orientation, shape and pose throughout the shot. Airborne objects remain suspended at the captured height and angle: no wobbling, shaking, spinning, drifting, falling or continued action. Keep faces, hands, clothing, liquids and the background motionless while retaining their natural appearance. Camera parallax is the only source of apparent movement. No cuts, zoom, morphing or added objects.

The shot begins from the front-view composition established by <Picture 1>, showing <Subject 1> in its captured pose and arrangement against <Subject 2>. Preserve the visible identity, silhouette, proportions, surface details, colors, clothing, accessories, and positions of all existing elements. Treat <Picture 1> and <Picture 2> as complementary views of this one frozen subject.

The camera follows a smooth circular path around <Subject 1> at a constant height, radius, focal length, and angular speed. Keep the same orbit center and maintain consistent framing. The camera remains directed toward the subject throughout. Its travel reveals the front, one side, the back, the opposite side, and finally the front again.

At the halfway point, after 180 degrees of camera travel, the rear-facing appearance corresponds to <Picture 2>. Use that reference for the subject's actual back-facing geometry, rear silhouette, rear surfaces, clothing construction, and other visible rear details. These features belong to the same subject from the opening frame and become visible naturally as the camera travels.

Between the supplied viewpoints, maintain coherent three-dimensional geometry and continuous surface appearance. Every element keeps its fixed position and orientation in the scene. Changes in visible silhouette, overlap, perspective, and occlusion arise solely from the camera observing the frozen arrangement from successive angles. Preserve the captured spatial relationships among all people, objects, and suspended elements.

Complete exactly one uninterrupted 360-degree orbit over the shot's full duration. The final view returns to the front appearance and composition established by <Picture 1>, with the same captured pose, arrangement, and framing. The scene remains silent throughout.

overall_soundscape:
Silence. No dialogue, ambience, or sound effects.

non_diegetic_music:
N/A
The prompt tags the references in the order they're connected: <Picture 1> is the hollow front, which the shot opens and closes on, and <Picture 2> is the hollow back, which appears at the halfway point.
The front comes around the side, the real back shows up, and it keeps going all the way to the front again. That's a full 360 with an accurate front and back. For the final render, raise the resolution to 0.9 megapixels (about 950 × 950 for a square, 720p-class detail).
Build your own AI influencer next
AI Influencer Pro course by PixelAI Labs with Krea 2 photos of a consistent AI character
If H3 can do this with a jacket, imagine what it can do with a person. In our AI Influencer Pro course you build one consistent AI character, train her own LoRA, then make Krea 2 photos and H3 talking videos with her, on the cloud or on your own GPU.
Settings cheat sheet
Settings cheat sheet for Flux 2 Klein 9B and MiniMax H3 ghost mannequin workflow
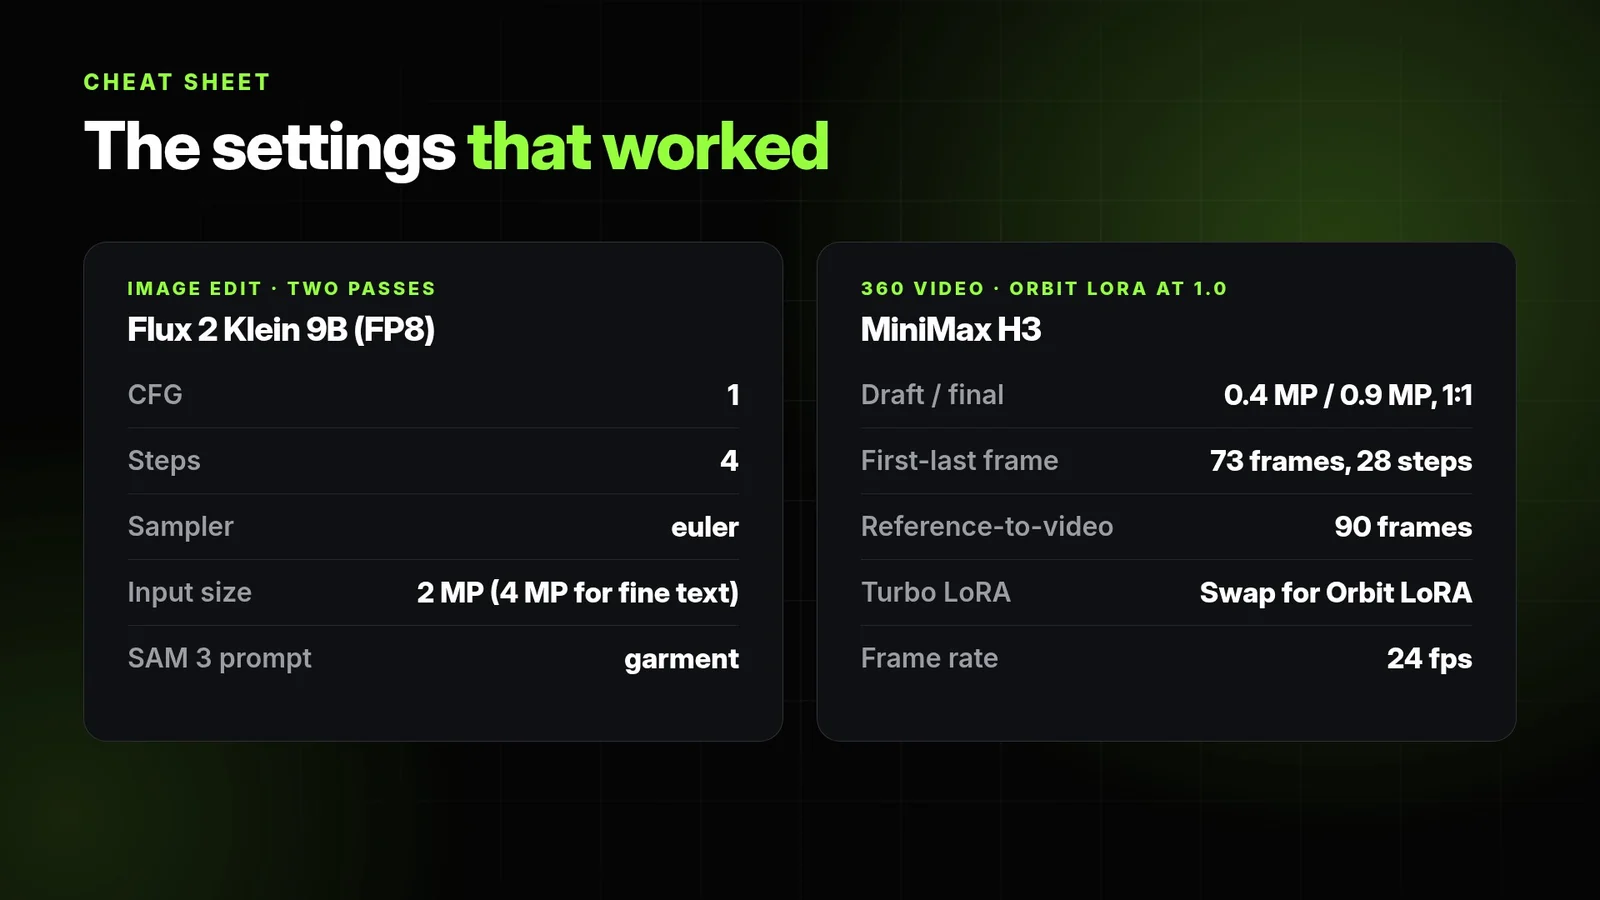
| Stage | Setting | Value |
|---|---|---|
| Flux 2 Klein 9B (both passes) | CFG / steps / sampler | 1 / 4 / euler |
| Flux 2 Klein 9B | Input size | 2 MP (4 MP for small text and fine details) |
| SAM 3 | Prompt / confidence | garment / 0.2 |
| Crop | Grow mask / padding | 30 px / 20 px each side |
| MiniMax H3 FL2VA | Size / frames / steps | 768 × 768 / 73 / 28 |
| MiniMax H3 Ref2VA (hybrid model) | Frames / steps / scheduler | 90 / 28 / euler + beta |
| MiniMax H3 (both) | Draft / final | 0.4 MP / 0.9 MP, 1:1 |
| Orbit LoRA | Strength | 1.0, replaces the turbo LoRA |
Troubleshooting
Red or missing nodes
Open ComfyUI Manager, click Install Missing Custom Nodes, then restart. Our ComfyUI Manager guide walks through it.
The logo or text changed
Raise the input size from 2 to 4 megapixels and start from the sharpest photo you have. Keep "the exact jacket from picture 1" in the prompt.
The output isn't square
Check that the Image Size By Longer Side output feeds both the latent width and height and the scheduler. If SAM 3 finds nothing, try clothing instead of garment.
The spin stops halfway
You're using the first-and-last-frame model with two different images. Use the same image for both frames, or switch to the reference-to-video setup in step 5.
The spin looks too fast
Raise the frame count. In the reference-to-video setup, 90 frames gave a slower, smoother turn than 73.
FAQ
Is this AI ghost mannequin workflow free?
Yes. Every model and node in it is free to download, and it runs on your own GPU inside ComfyUI, so there's no monthly subscription.
Does it work on other clothes?
Yes. Nothing in the workflow knows it's a jacket. SAM 3 just looks for a "garment", which is why the same graph works on jackets, puffers, tees and jerseys. Change the garment word in the pass 1 prompt.
Can I use a flat lay or a hanger photo?
Yes. The example started from a jacket on a hanger in an eBay listing. Pass 1 rebuilds it on a mannequin, so the original pose doesn't matter much.
Why put it on a mannequin first instead of asking for the ghost directly?
Asking for the hollow ghost in one step gave weaker shapes in my tests. A real mannequin gives the garment a believable body shape first, and pass 2 keeps that shape when it removes the mannequin.
Do I need the back photo?
Only if you want an accurate back in the 360 video. With just the front, the model invents the back. With front and back references in reference-to-video, you get the real one.
What GPU do I need?
Flux 2 Klein 9B FP8 is light for an image edit model, and MiniMax H3 is the heavier part. Draft at 0.4 megapixels, then render the final at 0.9. If your card struggles, use the RunPod template.
Conclusion
With Flux 2 Klein, SAM 3 and MiniMax H3, one listing photo becomes a hollow ghost mannequin shot and a full 360 product video, all free and local in ComfyUI. Put the garment on a mannequin first, let SAM 3 make it square, remove the mannequin in a second pass, and use reference-to-video with a real front and back for a spin that shows the actual product.
Download the workflows below, and if you want to take the same tools further, check out the AI Influencer Pro course and the rest of our ComfyUI workflows.
Downloads
The workflow files are attached below. Drag a JSON file onto the ComfyUI canvas to open it, then install any missing nodes from the Manager.